Monday, December 31, 2012

Red Rice and Chick Peas Salad

I started a new contract a few months ago. In this place Fridays are free breakfast days with bagels and doughnuts. Anyway before December the bagels disappeared long before the doughnuts ever did. The first week I thought it was an aberration but this happened week after week before Thanksgiving and December. I made a mental note that I was working in a very healthy place. Once the Holidays season hit there were lot more sweets and cookies in the kitchen and I also noticed doughnuts were starting to disappear before the bagels did.

According to my unscientific survey not only was I eating more cookies, candies and sweet stuff I was also noticing that everybody else was doing the same thing. And please please tell I am not the only one noticing these things!

The holidays are over and the New Year is upon us and here's

Wishing everyone of you dear readers a Very Happy New Year!


New Year means new resolutions and healthy eating. I have resolved to eat more salads with a lot of legumes and this recipe is a start. Chick peas is this protein powerhouse which I realize we should eat more than we are doing now. When I say salads I do not mean green leafy vegetables but lighter cooked salads.

Salads are successful when the dressing is tasty and light. I also like them to have a spicy kick and American pickles serve the purpose. If you do not have access to those, vinegar soaked green chilies would be a good substitute or a few splashes of your favorite hot sauce.

I have used red rice but wild rice or even brown rice can be used.

Red Rice and Chick Peas Salad Ingredients
  1. 1 cup of red rice (or any rice of choice)
  2. 2 cups of chick peas soaked overnight
  3. 3 Perisan cucumbers sliced
  4. 2 tbsp of chopped jalapeno pickled peppers
  5. 2 tbsp of lime juice + 1 tbsp of olive oil
  6. 1/2 cup of grape fruit slices
  7. 1/4 cup of feta cheese
  8. salt to taste
Method
  1. Cook the red rice as per instructions. Soak the rice for an hour and cook it in 2 cups of water.
  2. Cook the chick peas until soft. Take care not to make it mushy.
  3. In a large bowl mix together the rice and chickpeas.
  4. Whisk together lime juice,salt and olive oil and add to the rice.
  5. Add in the sliced cucumbers and peppers.
  6. Add in the grape fruit and gently toss them together.
  7. Top with feta cheese.
Can be served as lunch or dinner.

Thursday, December 27, 2012

Idli 101 - Idly 101 (from batter to finish) - Steamed Rice cakes - How to make Idli?

I had Ciabata bread (fast becoming my favorite bread) with an omelette, cheese spread and a banana malt smoothie for breakfast today. When I posed the question "What did you have for breakfast yesterday?" in these blog pages a few months ago the many responses suggested that traditional breakfast among Indians who live outside of the country is rare and is made mostly during weekends. As for people in India of the younger generation I am not sure what their breakfast habits are.

Though when we visit home, in my parents home, in laws home, aunts and uncles' homes the breakfast habits are the same as they were many years ago.

So I can safely guess what my parents had for breakfast. It would have been idli. The soft rice and lentil based rice cakes which are steamed and had with a side dish, be it a chutney or sambhar. The idli batter is prepared once or twice a week and used through out the week. Fresh batter is perfect for idlis. As the batter gets sour idlis do not come out good but are good for making dosais or paniyarams.

I try to make idli batter once a week and they are good thing to have on hand for a quick dinner any day of the week.

Making the batter

The Rice
The most important ingredient in making idli batter is the rice. If you are in India availability of idli rice might not be a problem. If outside of India it is obviously good if you have access to idli rice else ponni par boiled rice or Sona Masuri rice might be the ones that work best. Do not use the long grain parboiled rice, it makes the batter glutenous and that is not the correct texture for making idlis. The rule of thumb duller whiter rice and not the shiny transparent ones. If you are not able to get good idli rice, use a handful of soaked poha/aval (flattened rice) or cooked rice while grinding which seems to fix the batter.


The Lentil
Urad dal or black gram is the lentil you want to use. Back home a long time ago black gram with the skin on was what was used. Yes that would give the best kind of batter but cleaning and removing the skin before grinding is not a job that many people have time for these days. We conveniently have husked whole or split urad dal which works just fine. Using split or whole is personal preference as the quantity of batter they produce in my experience is comparable.


The ratio
The next important thing is the ratio of the rice to the lentil. If using idli rice the ratio would be 3 3/4 to 1, rice : lentil. If the rice you are using does not make as much batter as you would like increase the quantity of rice for a cup of lentil. Once ground the rice batter should be twice the amount of lentil batter. How do you know the ratio is not correct? The idlis are either flat, hard or mushy.
Fermentation
Once the rice and lentils are ground, add salt and the consistency should be thick pourable and not very watery. Set it in a warm place to ferment. Fermentation is very important without which we can forget about making idlis. If you live in a warm climate no extra precautions are necessary in about 6-8 hours the batter should rise which is the sign of good fermentation. In colder climes put the unheated oven to good use.

Place the ground batter in an oven with the light on. In about 8-10 hours the batter should rise. Once fermented mix it well and put in the refrigerator and it is good for 4 days for making idlis. Soaking the rice overnight also speeds up the fermentation process. While the lentil only requires about 20-30 minutes of soaking the rice should be soaked overnight more for the fermentation than making the rice soft enough for grinding. About 4 hours should make the rice soft enough for grinding.
In the oven with the light onFermented and rising batter


If you have any specific questions regarding the ingredients or the process please do so in the comment section.
Ready to eat?


Idli Batter
Ingredients
  1. 3 3/4 idli rice (quantity of rice will be different if using a different rice)
  2. 1 cup of husked black gram dal (urad dal)
  3. 1 heaping tbsp of fenugreek seeds
  4. handful of poha/aval/flattened rice or cooked rice (optional, see Note:)
  5. 1-2 tsp of salt
  6. Note:Keep a handful poha or cooked rice handy to add to the batter if you do not have idli rice. Soak the poha with just enough water to soak it(about 10-15 minutes is sufficient). Just before adding the rice to blend add the soaked poha or cooked rice for blending.
Method
  1. Wash the rice and soak it with plenty of water overnight.
  2. Soak the fenugreek with the rice or separately.
  3. About half an hour before starting the grinding process, wash and soak the lentils. I soak them overnight along with the rice because it seems to speed up the fermentation process.
  4. A grinder works great but a blender should work also. Grind the lentils first. Usually about 20-25 minutes of grinding is required for the lentil. Once done remove the lentil batter to the container you are going to ferment the batter in. The container should be large enough for the lentil and rice and then some for rising.
  5. If using poha or cooked add it now. Let the grinder run for a couple of rounds before adding the rice. Grind the rice about 30-40 minutes till the rice has been ground but do not make it completely smooth, stop grinding when there is still some texture to the rice like Cream of rice texture.
  6. Add salt and mix the lentil and rice batter together. Hands work best and they also I understand help in the fermentation process. Good bacteria and all that. Clean hands of course.
  7. Place the container in a warm place for 6-10 hours till the batter is fermented.
  8. Once fermented mix the batter with a ladle and store right away in the fridge.
Make Idlis
  1. Grease the idli mould with spray or sesame oil.
  2. Pour the required amount of batter in the idli mold.
  3. Place the idli mould in a pressure cooker or a steaming vessel and steam for 12 minutes.
  4. Let steam subside and cool for about 5 minutes. Remove the idlis from the mold.
Also check Kitchen Utensils 101 - Grinder

Sunday, December 23, 2012

Kongu style Mutton Curry

Winter is not my favorite season. Coming from a place where even the winter temperature never go below 70F it was hard getting used to the frigid temperatures. Once the clock falls back and the darkness falls things start to look a bit depressing and thoughts of my home country come fast and furious.

Anyway something happened a couple of years ago. Winter temperatures do not bother me that much. Maybe it is global warming that has kept winter temperatures relatively mild or I have lived her long enough that I have gotten used to the cold and how to deal with it.

The winter temperatures also make me crave spicy but familiar foods especially mutton curry the way my mom makes it. The funny thing is my mom grew up in a strictly vegetarian home where the chicken cannot even walk in the yard seriously that is not an exaggeration.

Anyway these days she is back to not eating non-veg after a brief period of eating them. I am not sure if she enjoyed them or not.

If I ask if the kids want chicken or mutton they usually pick chicken. The spices and the method of preparation works for both.

Kongu style Mutton Curry Ingredients
  1. 3 lbs of goat meat (mutton)
  2. 1 1/2 cups of red onion chopped

  3. 1/4 cup of finely chopped shallots or red onion for seasoning

  4. 8-10 cloves of garlic

  5. 2 tbsp of ginger

  6. 1 1/2 tbsp of coriander seeds

  7. 1 tsp of cumin seeds

  8. 8-10 red chilies or per taste

  9. 2 tbsp of curd

  10. 2 tsp of turmeric powder

  11. seasonings: 3 cloves, 1/2 inch of cinnamon, 1 tsp of fennel seeds + a sprig of curry leaves

  12. salt to taste

  13. 3 tsp of oil


For the masala paste
  1. In a pan heat a bit of oil, roast the coriander seeds, cumin and red chilies and when they slightly darker color, take them into a blender.
  2. To the oil add chopped onion and let them saute till they are slightly browned.

  3. Add the garlic and ginger and saute them for a couple of minutes.

  4. Cool and blend them with as little water as possible to a smooth paste. My blender does not need water but couple of tablespoons or more is perfectly fine.

Method

  1. Add the curd/yogurt and turmeric powder to the meat and mix well. Let them sit for about 1/2 hour to 1 hour.
  2. In a pressure cooker heat oil add the seasonings and when they start to turn color,
  3. Add the finely minced onions and saute till they are translucent.
  4. Add the marinating mutton pieces and saute till the pink color is gone and they start to turn color.
  5. Add the masala and saute it well with the meat.
  6. Add about 1 cup of water, salt and bring to a boil. Place the lid and weight and cook for 2 whistles.
  7. Let the steam escape and in medium heat continue to saute till the required consistency is reached. Check for salt and heat. If more is required add some red chili powder.

Thursday, December 20, 2012

Fig Fruit Cake (Arkansas Fig Fruit Cake, Eggless)

Fruit cakes have a bad reputation in this country for reasons I don't understand. I have asked several people why they don't like them. Answer invariably comes down to, too many fruit cakes this time of the year and everybody seems to giving those as gifts.

Thick batter!


I for one would have loved to get fruit cakes for gifts. The only kind I am not fond of are the really boozy kind which leaves an after taste.

The Washington Post Food Section from a couple of weeks ago had at least 7 recipes for fruit cakes. I picked this one because I had most of the ingredients on hand and they were not many. It seemed like it would lend itself to variations easily as far the nuts and dried fruits went.

Ready for the oven


The recipe called for mixing of the batter with hand which is new for a cake recipe for me anyway. The other interesting thing there is no fat - oil or butter. Nope!

If you do not have figs I think a combination of dates and dried cherries would work beautifully. I am not used to adding cloves and cinnamon for sweet things so skipped them but of course as per your preference go ahead and add them. It is one of those very easy to make cakes with no whipping and fluffing so even for someone baking challenged like me it was easy.

It is a shame that these fruit cakes are made only during Christmas. These are a great after school or a lunch box snack.

Arkansas Fig Fruit Cake Ingredients
  1. 2 cups all purpose flour, I used 2 cups of white whole wheat flour
  2. 10oz dried figs
  3. 1 Golden Delicious apple peeled, cored and finely diced
  4. 1/2 cup dried raisins
  5. 3/4 cup dried currants
  6. 1 cup pecans roughly chopped (skip for nut free version and substitute with a cup of chocolate chips perhaps or coconut flakes)
  7. 1 cup sugar + 3 tbsp more
  8. 2 cups of water + 2 tbsp more if neeeded
  9. 1/4 tsp salt
  10. 2 tsp baking soda
  11. 1/2 tsp ground cinnamon + 1/2 tsp ground cloves (optional, I did not add them)
Method
  1. In a saucepan add the figs, 3 tbsp of sugar and 2 cups of water and bring to a boil, lower the heat to just below medium and cook for about 30 minutes till the figs are soft. Let cool and using a hand blender make a puree.
  2. Preheat the oven to 300F.
  3. To the fig puree add the raisins, currants, pecans and apples.
  4. In a mixing bowl large enough to hold all the ingredients take the flour, sugar, salt,baking soda, spices if using and mix them together.
  5. To the flour add the fig puree and mix it together. It would be hard at this point to mix with a spatula so hands work best. Add a couple of tbsp of water if it is too dry.
  6. Grease a 9inch cake pan (with butter or spray) and transfer the batter and smooth the top with a spatula.
  7. Bake for 50 -60 minutes or till a skewer inserted in the center comes out clean.
  8. Cool for 30 minutes.

Note:

A tube pan would make it festive. Loaf pan works too.

Reduce the amount of sugar by a quarter cup if you are using dates and do not add teh sugar while cooking it.

Monday, December 17, 2012

Grief!

I have no words to express the feeling of grief and sadness that has been clinging the last few days. If it is this hard for us who are mere spectators from so many miles away I cannot even remotely fathom what the families are going through. Pray that God will give them the strength to bear.

I started to write this post many times the last few days but a combination of grief, anger and helplessness made it hard to find words and coherently write something.

I have been watching way too much TV listening to our politicians and wondering if anything will really change. As these politicians flit in and out of talk shows mouthing platitudes a knot of fear grips. But one has to hope for the best so hope I will.

We as citizens also have the power to force change don't we?

It is impossible to understand what drives people to hoard arms. Hiding behind the second amendment weapons manufacturers, NRA and others have not only made a lot of people extremely paranoid they have also laughed all the way to the bank.

The only politician who was ready to call a spade a spade was New York mayor Michael Bloomberg. His answer to David Gregory on Meet the Press,

"David, I can’t tell you that if you stopped people who have psychiatric problems, who have criminal records, who have substance abuse problems, who are minors; if you stopped every one of them from buying a gun, I can’t promise you that this particular event wouldn’t have taken place. But this particular event is just one of a series that happens again and again and again. And a big chunk of those would have been placed. It’s like your argument is there’s no reason to have speed limits because it wouldn’t have stopped that one person when the cops weren’t around that they stepped on the pedal. That’s not true. They all-- the aggregate of all of this would be if we-- if Congress were to act, if Congress wasn’t so afraid of the NRA. And I think you can-- I can show you that they have no reason to be. But if they were to stand up and do what was right for the American public, we’d all be a lot better off. And Congress has the ability to do this. And the president, in my view, is the one who has to lead this. The president campaigned in ‘08 on an assault weapon ban. And the only gun legislation that the president has signed since then, one is the right to carry a gun in national parks where our kids play and one is the right to carry guns on Amtrak. I assume that’s to stop the rash of train robberies which stopped back in the 1800s. And this is ridiculous." Quoted from transcript of Meet the Press.

We need the President to step up to the plate and use his bully pulpit to bring all politicians in line and do what is right. For the good of everybody hopefully he will lead.

Other countries have made changes when faced with similar tragedies and have been able to successfully curb deadly weapons. Australia did it, Scotland did it. US calls itself the greatest nation on the face of the earth where everything is possible. Will it be able to protect its children? If it cannot nothing else matters really! With Hope and Prayer!

Monday, December 10, 2012

Kitchen Utensils - 101 - Grinder & Mixie (Blender)

No kitchen in India especially South India can survive without a grinder and a mixie called blender here in the US. Its utility starts at breakfast time to make chutneys that are an essential side for common breakfast items like idli or dosai, continues its usage to lunch and dinner time for making masalas or chutneys again.

Grinder

Grinders are used for grinding batter for idli and dosai mostly. While grinders can be used when a large quantity of masala or chutney needs grinding. Their use in a family kitchen is for making batter. In my kitchen I used it for making idli batter, adai batter and any other kind dosai batter. I have never used it to make chutney or masala because I have never had the need to make that large a quantity. So if grinding idli batter is not a requirement look to the blender.


Wet Grinder

Manual stone grinders called aatuural and ammikal were used in kitchens even about 15-20 years ago when electric grinders and mixies were not that common. Now you will be hard pressed to find a kitchen still using those stone grinders. My mom's kitchen has an ammikal which is a rectangular piece of stone embedded in her counter top. A cylindrical piece of stone is rolled over the rectangular stone to make masala pastes. These days it rarely gets used being replaced by easy to use electrical appliances.


Wet Grinder Innards

Check this link to see a traditional attukal or stone grinder in use. Here is a link to the ammikal.


Doing its job

Blenders

Blenders pulverize anything to liquid or powder pretty easily. Infact they are made just for that. In an Indian Kitchen blenders/mixies are used for making chutneys, masalas, smoothies and spice powders. The Indian mixie especially compared to a blender in the US is made so that the blades are able to spin without addition of too much water. So if you are in need of a machine to make chutneys, masalas and the like blender is what you need. I a pinch blenders can also make idli batter but patience is required because these are not meant for the slow grinding that that idli batter requires.

While I bought my wet grinder from a store here in the US I carried my mixie from India.


Indian Mixie/Blender

My trusty old Osterizer Blender - 12 Speed did a splendid job till I bought myself an Indian mixie. During one my visits back home about 5 years ago found it hard to resist when the appliance/kitchen utensils store I regularly visit nad a 110V Preethi Chefpro Plus available right there. While the Osterizer blended masalas pretty well, addition of water was required to get the blades to move whereas the Indian mixie does not need water so it is a breeze to make make thick chutneys, masalas and powders. For me it is well worth it.


Comes with 3 convenient jars, tall for juices,
medium and small for wet and dry

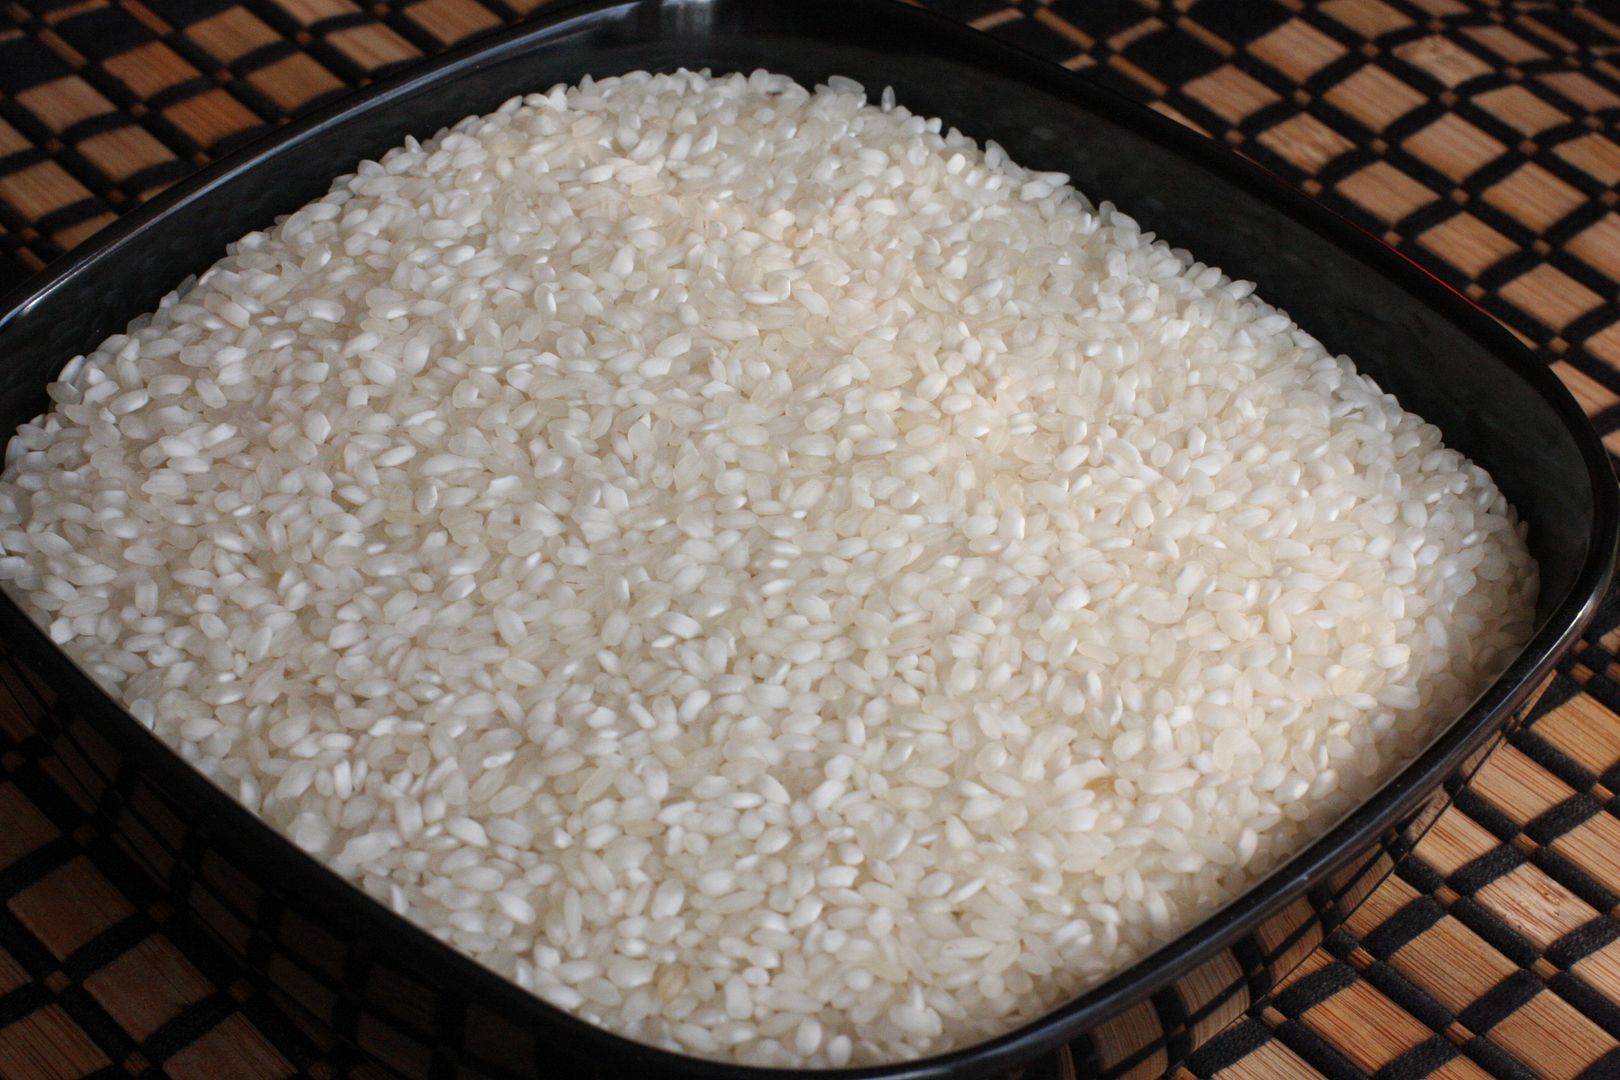
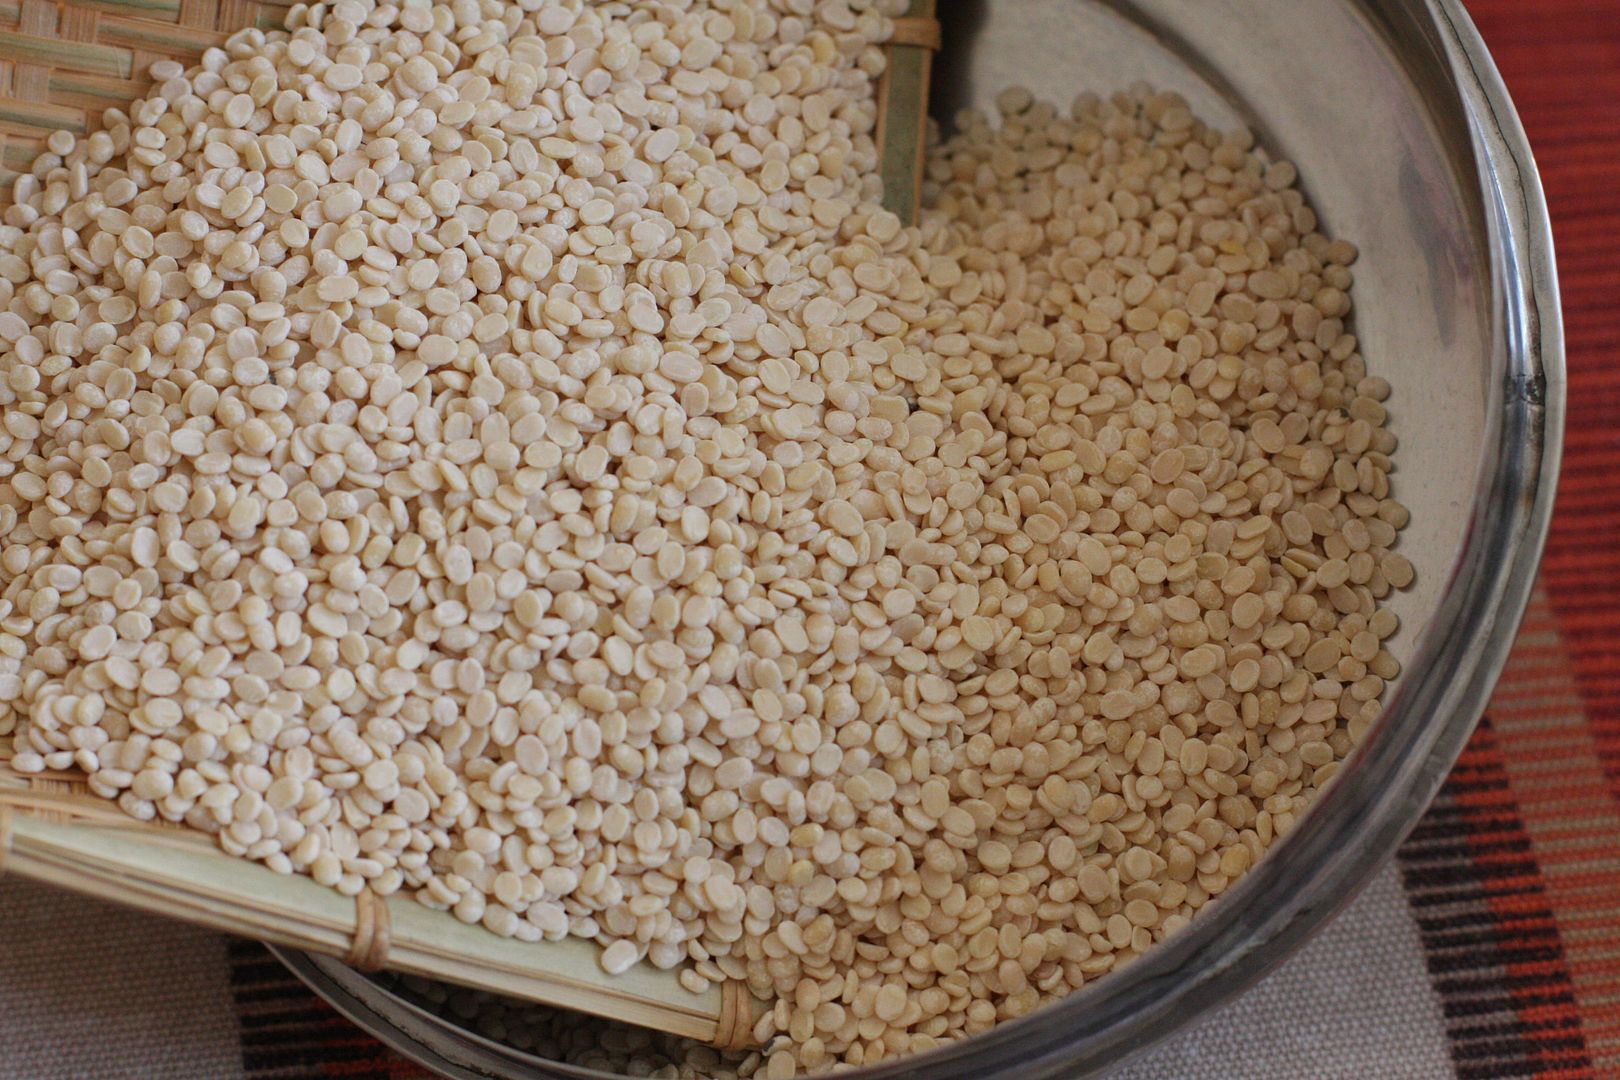
In a pinch a blender could well substitute for a grinder with which I used to make my idli batter long time ago. The grinders is worth it just for making idli batter. Idlis(rice cakes made with rice and lentils which are a staple breakfast item in South India) requires soaking/blending rice and lentils and fermenting the batter. It takes me about an hour(time for the process) to blend the batter which I do every other week. Having idli batter means easy dinner/lunch options throughout the week.


Blender doing its thing

Of course without the grinder blending the batter is not always that easy. Blenders tend to heat the rice/lentil when blending which is not a good thing and the consistency of the batter also matters otherwise the idlis tends to be brick hard or mushy and slimy. I will be amiss if I do not mention that having the right rice is also very essential.


Trusted old Osterizer

While the blender tends to chop with the fast spinning blades, the grinder uses a much slower spinning where a pair of stones spin inside another stone container to do the grinding.

Disclaimer: This is intended as an article to talk about the appliances themselves not endorsing a product from a specific company.

Tuesday, December 4, 2012

Basundi (a milk sweet)

It is the season after all. To be thankful for the good things you have in life. I know there is nothing like the present to show appreciation but the holiday season always brings it all out. The atmosphere and the things you see around all help bring it to sharper focus like the flickering lights in every house, tinkling of bells mostly by Salvation Army bell ringers and not to forget the multiple holiday parties and cookie socials.

Living faraway from home guarantees that you miss most important milestones of the people close to you. Occasions like birth, weddings and other happy happenings always make me ponder about the life of an immigrant so far away from home but it is nothing compared with the sadness when there is death in the family. It is one occasion when you want to be close to loved ones, console them and be able to be of some help. Even feuding relatives make it a point to visit a bereaved home. Visiting families when they are saddened by loss carries a lot of meaning in the Indian culture.

Talking to friends, DH and kids provides comfort and I am thankful for them every single day but there is always a special something that comes from talking to my brother or cousin who share the bonds from my childhood, who know the quirks that makes up my family and are able to laugh about it. When talking to them it is OK to be unhappy or disappointed about people close to you, or share those pesky fears and guilt that comes from leaving parents behind and wondering if they might need our help. It is telepathic when I hear the phone ring and it is one of them calling and it is the exact moment when there is something swirling in my that I want to unload.

Bonds made in childhood are the strongest and I am thankful for the few of those ties are also in this country we now call home. It is one of the things I want to say thanks for.

What are you most thankful for this holiday season?

Holiday season also signals the cooking of foods rich in butter, creamy desserts, cookies and cakes. I tasted basundhi, a creamy milk sweet at a friend's house recently and it brought back my wish to try making it. Need I say it is rich and creamy and is a perfect dish for the holidays.

The only time I have seen this dish being made was my MIL when there was an abundance of milk after an occasion. It is not a hard dish to make but requires time and patience. She did it by boiling the milk and taking out the cream layers that formed on top and setting it aside till the milk had reduced and then the separated cream was added back into the milk. Instead of taking the cream and setting it aside it can also be done by just moving the creamy layers to the side as the milk reduces in quantity. I followed a combination of techniques.

Time Taken: 2 1/2 hours Basundi Ingredients
  1. 1 gallon of whole milk
  2. 1 1/2 cups of sugar (or as required)
  3. 2 whole green cardamoms
  4. a few strands of saffron
  5. 2 tbsp of roasted and roughly chopped pistachio nuts
  6. 1/2 tbsp of charoli nuts roasted in a bit of ghee(in Tamil sara paruppu)
Method
  1. Heat the milk along with the cardamom and saffron (see note)in a heavy bottomed pan with the flame on below medium. Drop 2 steel spoons to prevent the milk from burning or sticking to the bottom.
  2. Use a sturdy spoon and keep stirring the milk to avoid it sticking to the bottom carefully moving the creamy layers to the side. Do not worry if the creamy layer disintegrates into the milk. Alternately you can start removing the creamy layers to a separate containers.
  3. The milk starts to reduce and when it has reduced to a little less than half. At this stage remove some of the creamy at this point and setting them aside if you have not already started doing it.
  4. Remove the steel spoons. Add sugar and continue to stir and when the milk has reduced to about quarter of the volume, gently mix in the cream and turn off the heat. The milk thickens some more when it cools. Serve chilled or warm.
  5. Sprinkle the nuts just before serving.
Note:
1. I added whole cardamoms and left it in there. Alternatively you can powder the cardamoms and add towards the end. Same with saffron, you can soak it a tbsp of warm milk and add towards the end.